

I’ve spent the last few days making this work properly across multiple VLANs, because AT&T does NOT even REMOTELY conform to any kind of industry standard for dishing out IPv6 blocks or addresses.
Normally your WAN would receive a /56 block from an ISP, giving you 00-FF in blocks to assign off of that. And everything you read online says AT&T gives out a /60, which is true. But it’s misleading if you’re expecting to be able to USE that /60. You cannot. You cannot give your WAN adapter a /60 prefix, it does not work that way. It will always be a /64. (we’re not talking about a custom ONT SFP module here or what-not, obviously some people have made it work that way).
So, assuming you just want to use the AT&T BGW320 as-is, and you want multiple IPv6 prefixes, here’s my quick little guide on that.
On the BGW320:
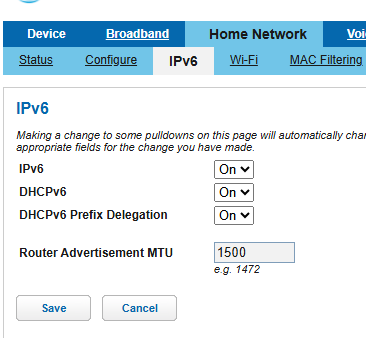
Turn all 3 settings to On under Home Network > IPv6
Under Firewall > Packet Filter, click to Disable Packet Filters (Note: This is not required for this guide, but you should just let pfSense handle packets if that’s your router)
Under Firewall > IP Passthrough
– Allocation Mode: Passthrough
– Passthrough Mode: DHCPS-fixed
– Passthrough Fixed MAC Address: pfSense WAN adapter MAC address
Under Firewall > Firewall Advanced: I would recommend Reflexive ACL, ESP ALG, SIP ALG be turned Off.
pfSense Configuration
Under Interfaces > WAN
– IPv6 Configuration Type: DHCP6
Note: If you only ever want 1 prefix to use for your LAN, and don’t plan to use any other /64 blocks, you do not have to use a custom configuration and could essentially stop here. Set DHCPv6 Prefix Delegation Size to 64 and that’s it, leave the rest of the boxes unchecked. Your WAN will get the passthrough address from the BGW320, and then you’ll have one prefix delegated to use which you can assign statically on your LAN adapter.
If you want multiple /64 prefixes to use, you will need to SSH into your pfSense machine. As that is kind of out of the scope of this guide, but basically use PuTTY or ssh from a linux machine to your pfSense LAN IP, and login with your admin credentials. The menu should say to enter option 8 for a shell I believe.
At the shell, type ls /var/etc/dhcp6*.conf to list your dhcp6 configuration file. It should either be dhcp6c.conf or dhcp6c_wan.conf in some cases I have read. Mine was dhcp6c.conf. We need to copy this file to a new location so we can modify it and use it as our custom WAN interface configuration file. So type cp /var/etc/dhcp6c.conf /conf/dhcp6c_att.conf
cp /var/etc/dhcp6c.conf /conf/dhcp6c_att.confnano -w /conf/dhcp6c_att.confEdit the file to include extra send ia-pd # lines. The stuff in bold is likely what will not already be in the file. But ultimately you need to start with send ia-pd 0, then 1, then 2, and so on. This is literally my current running configuration, so I hope it works for you. Do not blindly copy and paste this, make sure your interface name matches YOUR firewall, not mine! And yes, I plan to stop using a RealTek adapter soon. I also don’t think the prefix ::/64 infinity; lines are necessary but I added them just in case. The real important part is the send ia-pd lines.
interface re0 {
        send ia-na 0;
        send ia-pd 0;   # THIS WILL BE YOUR 'f' PREFIX and will probably already be in the file
        send ia-pd 1;   # ADD THIS to get the next prefix after f (e)
        send ia-pd 2;   # ..and so on, up to send ia-pd 7 if needed, for a total of 8 usable /64 blocks
        request domain-name-servers;
        request domain-name;
        script "/var/etc/dhcp6c_wan_script.sh";
};
id-assoc na 0 { };
id-assoc pd 0 {
        prefix ::/64 infinity;
};

id-assoc pd 1 {
        prefix ::/64 infinity;
};

id-assoc pd 2 {
        prefix ::/64 infinity;
};
To save your edited file, press CTRL-X, press Y to save, and then press Enter to overwrite the existing file. Alternatively, you can press CTRL-O and then Enter to write the changes out, and then CTRL-X to just exit.
You’ll notice that the blocks actually start at the end of the /60 from the BGW320. So if the BGW320 gives your WAN 2600:1700:a123:b340::, then your first usable /64 will be :b34F, the second is :b34E, the third would be :b34D and so on, C, B, A, 9, 8. 0-7 are reserved by the BGW320 for internal stuff apparently. Personally I’m only using 3 prefixes, and haven’t tested the limits.
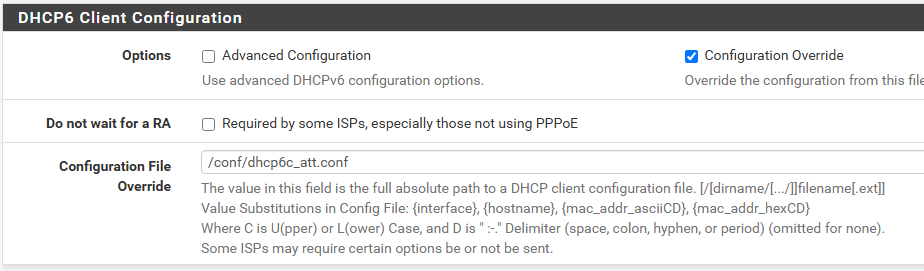
Back in pfSense, under Interfaces > WAN, scroll down to DHCP6 Client Configuration, and enable the checkbox for Configuration Override. In the next step we’re going to be creating a configuration to use, so for now, type into Configuration File Override the following: /conf/dhcp6c_att.conf
Save and apply your WAN changes. If all goes well, back on your BGW320 under Home Network > Status, you should see under the IPv6 section near the middle your IPv6 Delegated Prefix Subnet section, and it should list as many prefixes as you put send ia-pd’s into your dhcp6c_att.conf file.
Back in pfSense, under the lan/vlan/tunnel interface(s) you want to assign an IPv6 network to, set their IPv6 type to Static, and, e.g. with our example above, if you have 2600:1700:a123:b34f::/64 as one of your delegated prefixes, set your interface static to 2600:1700:a123:b34f::1 on a /64 subnet size. And then that interface will hold the ::1 ipv6 address on that prefix.
GOOD LUCK!