
Let’s get into it! I wanted to try a Hall Effect keyboard and noticed the J4 HE TKL was on sale for ~$85 USD, so I picked one up. And it is absolutely wonderful to type on. I’m writing this review with it because I think it’s that good.
Full disclosure, I did buy a V3 8K TKL at the same time, but I’m opting to review this one instead because I think it’s just a really nice experience to use. I may do a short write-up of the V3 8K as well. And no, this is not sponsored in any way.
And I am definitely not as qualified as many others to speak about keyboards, switches, etc.
What really inspired me to make this review is two-fold. I had a Steelseries Apex 7 TKL that I spilled a drink on, and since I had never been into switches on keyboards before, I figured “Hey, I can just replace the switches!”. But I soon came to learn that they are soldered in, like most of the popular brands of keyboards. And while I am proficient enough to do that, I don’t want to have to do that.
And so I was looking at the new Apex 7 Pro TKL for $200 USD…but again, the switches are soldered in. If you’re going to pay $100 – $200 for a nice keyboard, you should be able to replace the switches easily and quickly.
And then I turned to my Logitech G Pro X TKL Wireless – and while some variant of that keyboard did have a hotswap board, again, mine does not. I’m simply not going to spend that kind of money on a keyboard again if I can’t maintain and fix it easily and readily. I don’t want to have to bust out my soldering iron to fix a switch.
I started looking for keyboards with replaceable switches and landed on Keychron.
Overview


The Wireless USB dongle stores in the back, which is a nice touch. Along with the Windows and Mac switch, and the Wireless, USB, and BlueTooth switch. It uses a standard USB-C connection for charging and connectivity.

Switches and Performance
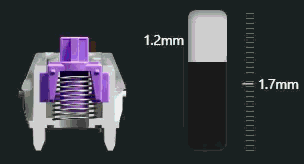
The keyboard features Keychrons Ultra-Fast Lime Magnetic Switches:


They are incredibly simple to remove since there’s no pins!
I used to do a lot of typing, and even competed against others online when I was younger. I’m still pretty good, and this keyboard made it so much easier. It just feels and sounds amazing. On typing-speed-test.aoeu.eu which is a favorite pasttime of mine to practice on, I was able to hit 800 CPM, which felt really good. It’s honestly been a while since I was able to type that fast.

How it Sounds
So, typically, my coworkers prefer if I’m using a quieter keyboard, for reasons pictured above. As for how this keyboard sounds… I find it really, really satisfying. I’m not really geared to record videos, but I’ve recorded a quick audio clip of myself typing on the site mentioned above:
Configuration/Switch Actuation
It’s absolutely insane to see the switch precision when you’re on the configuration page. The overall view of the configuration page is where you can configure all of the settings. I’m not going to delve into the settings much as their are far better resources out there than my little review here, but this is the configuration page:

The switch knows where it is at all times. It knows this because it knows where it isn’t.


The GIF doesn’t do it justice honestly. It’s very easy to move in 0.1mm increments.
If you have any questions, feel free to post them here! Thank you!
