
This guide will attempt to help you setup a WireGuard VPN on your pfSense (2.6.0) firewall / router. By the end of this you should be able to connect to your VPN with a mobile device (Android / iPhone) or laptop / PC. This will not walk you through every facet of the install as I am going to assume you know how to install packages and apps.
On your mobile device, you’ll need to install the WireGuard application from the App Store / Play Store.
Windows users will need to download the client from the WireGuard website: wireguard.com/install/
And of course, in pfSense, you’ll need to install WireGuard from the package manager.
We’ll get to configuring the clients later and focus on setting up the pfSense side first. As a means of avoiding confusion, I am also going to write the IPv6 setup separately as a lot of users will not need this.
pfSense Configuration
Start by going to VPN -> WireGuard, which should bring you to the Tunnels page. On the right side, click the green “+ Add Tunnel” button.
Enable Tunnel: Make sure this is checked.
Description: whatever you want, something to identify which clients will be connecting to this tunnel, e.g. Home Tunnel
Listen Port: You can change the default if you want, leaving it blank will use the default port of 51820
Interface Keys: Make sure you click the blue Generate button. This will populate the private and public keys.
Do not click Interface Assignments or WireGuard Interface Group until after you have saved the tunnel. It will clear the public key out.
Skip down to Interface Addresses, and assign a new, local IPv4 address, such as 192.168.99.1 / 24. This ‘network’ will be what WireGuard clients use. They will still be able to communicate with your home LAN as long as you permit it in the firewall rules later on. You should have something like this (if this is your first tunnel, it will be tun_wg0 and not tun_wg1, which is fine):
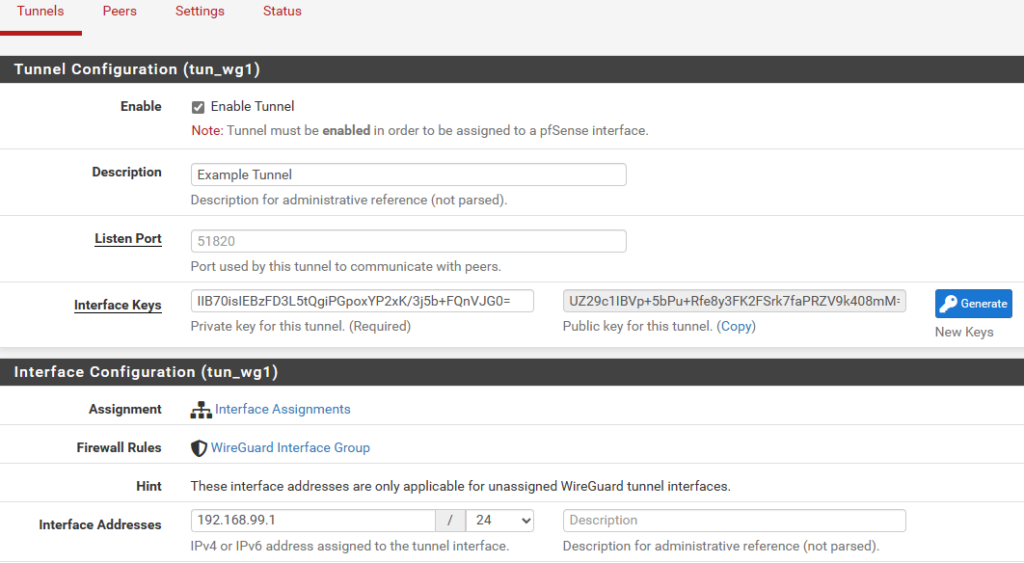
Click on Save Tunnel at the bottom of the screen. Apply changes.
Firewall Rules
Go to Interfaces -> Assignments and add your new tun_wg0 interface from the list of Available network ports. Then go into the interface itself and make sure it is Enabled. I also like to change the name to something like CLIENT_VPN. You do not need to add any firewall rules to this interface. I found if I could use IPv6 without this interface but not IPv4. So I recommend creating it.
Next, go to Firewall -> Rules. You will notice you have 2 interfaces, one called WireGuard and the other called OPT## or whatever you may have renamed it to in the interface settings (e.g. CLIENT_VPN). I have found I do not need any rules under CLIENT_VPN/the OPT interface. Officially it says to add an allow all to any rule but it never generated any traffic, and so I disabled it and have never had any problems.
The main area we want to add rules in is the WireGuard interface. For simplicity, add a new rule in the WireGuard interface to allow all IPv4 traffic, any protocol, any source/destination. For advanced configuration, this is where you will limit which clients can access what. e.g. if you assign a client 192.168.99.5, you can firewall just that IP in here.
Navigate to Firewall -> Rules -> WAN and add a new rule to allow any UDP traffic to 51820 (or your configured port). Instead of a rule, you may need to add a NAT forwarding rule instead, to allow incoming traffic to 51820 (or your configured wireguard port) to forward to the wireguard tunnel IP address (192.168.99.1 for example).
Apply changes.
Configuring Client(s)
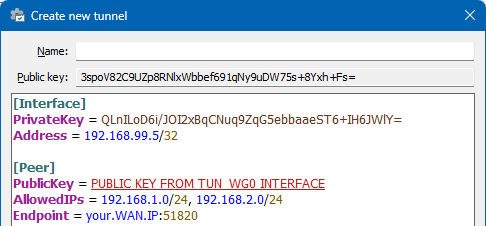
First, we need to configure the client, before we can add them to the server. I realize this sounds a little backwards, but clients need to generate their own public key first, which then gets added to the server.
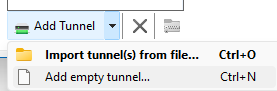
In the Windows client, click on the arrow beside New Tunnel and select Add empty tunnel
Then you’ll need to type some configuration in. The Public-key at the top of this create new tunnel wizard, we will need for later, to add into the Peer section of pfSense. Under the [Peer] section, you will need to use the public key of the tun_wg0 interface in pfSense.
A note on AllowedIPs: If you want to route ALL traffic through your VPN (lan & internet), specify 0.0.0.0/0. If you only want to use your VPN to access your LAN networks, then add your network(s) separated by commas.
I FORGOT SOMETHING IN THIS SCREENSHOT. Under [Interface], add a line called DNS = which should point to your DNS servers you want to use. In order to resolve local hostnames this part is critical. If you’re only doing IP addresses it will be less important. e.g. DNS = 192.168.99.1, 10.1.1.1.
I also just learned you can add DNS search domains to the list, so e.g. DNS = 192.168.99.1, mylan.local and mylan.local will get added to Search Domains.
[Interface]
PrivateKey = <automatically generated>
DNS = 192.168.99.1 or other DNS IP running on your network.
Address = the IP this client is allowed to connect to the VPN with
[Peer]
PublicKey = The PUBLIC KEY from the PFSENSE server tunnel
AllowedIPs = the list of IPs you want to use this VPN to connect to (e.g. your local networks only, or 0.0.0.0/0 for ALL internet traffic)
Endpoint = the public WAN IP address of your pfSense router
Adding Peers to pfSense
The server is now setup, we have our first client configured, and we can begin adding our peers. Navigate to VPN -> WireGuard. Then click on the Peers heading. Then click on the green “+ Add Peer“.
Enable: Make sure this is checked.
Tunnel: Select your tunnel interface that we created.
Description: A description of who this client is for easy reference.
Dynamic Endpoint: Leave this checked.
Keep Alive: It seems generally recommended to leave this blank, which is disabled.
Public Key: The public key from configuring the client in the previous step.
ADDRESS CONFIGURATION / ALLOWED IPs:
A lot of users get confused on this part. Generally one would assume this is where we control what networks the client is allowed to access; but that is actually done from the Firewall rules. THIS section of Allowed IPs is actually ‘which IPs is the client allowed to assign themselves on the VPN tunnel’.
So you need to decide, for every client, what their IP address will be on the VPN. You will almost always want this to be a /32 for an IPv4 and /128 for an IPv6 address. If you do it as a /24 then other clients will not be able to use the address space, and they will be unable to connect to the VPN at the same time.
So, for our first client, let’s do 192.168.99.5 / 32 as that will match what we configured above.
Save peer and apply changes.
Finished!
You should now understand the basics to creating a WireGuard VPN. Primary notes would be that the PUBLIC KEY of the server is used in the PEER section of the CLIENT. The PUBLIC KEY of the CLIENT is used in the peer section of the SERVER. You will never use, nor should you distribute, the private keys. The ones used in this article were temporary only.
You may also want to go to Services -> DNS Resolver and make sure it is listening on your tunnel interface, so you can use it as a DNS server for the VPN clients.
Also note you will not be able to connect to the VPN from the same network that it is running on. Switch to 4G/5G mobile internet and use a hotspot to test or etc.
TODO:
IPv6 is the same as above, but add an additional IP to your tun_wg0 interface (either an fd00 local address, or a fully routable WAN address from your ISP. e.g. my ISP gives me a /56 block, so I use a whole /64 block for my VPN clients). Give them an allowed IP in the peer section, configure the client to also use that IP (Address = 192.168.99.5/32, 1200:1300:1400:1500::1015/128, and also modify AllowedIPs = to include IPv6 address spaces, or ::/0 for all IPv6 routing)
I will work on cleaning up the wording and adding some additional pictures as well. But I really need to get this site migrated to a new server first.
Hello,
I’ve been trying for ages to make this work on IPv6 using PFSense+.
Let me summarize what I’ve done:
– My ISP assigns me xxx:6D00::/56 for IPv6
– So I set up the tun_wg0 interface with a static IP of: xxx:6d11::/64
– in VPN/Wireguard under the peer I put in the allowed IPs: xxx:6d12::/128 for the clients
– in firewall rules IPv6 is allowed for Wireguard and for the tun_wg0 interface
On the client (Android) side I put:
Addresses: 10.200.0.5/32, xxx:6d12::/128 and under allowed IPs I have 0.0.0.0/0, ::/0 but still cannot get any IPv6 traffic over the VPN.
Could you please be so kind and give me any clue on what am I doing wrong?
Thanks.
Heya it’s late here but in this post you put 6d12 as the client? It needs to be in the 6d11::/64 subnet. So the peer would be like .. 6d11::1000/128
Your tunnel should have an IP too like …6d11::1/64
That’ll be your tunnel gateway essentially.
Each /64 is like a /24 in ipv4. Treat it as its own subnet.
So ..6d11::/64 gives you ips from 6d11:0000:0000:0000:0000 to 6d11:ffff ffff:ffff:ffff
But in short form you get 6d11::1 which is 6d11:0000:0000:0000:0001 (note 2 colons vs 1 in short vs long form)
Of course you should use the short form but just trying to help you understand the subnets
I’ll try and update this Wireguard post a little more this weekend to clarify some things but just reply if I can help more!
That worked!!!
Thanks a million for all the precious info you provided me.
Best regards,
Andrei
Awesome! I’m glad it worked and happy to have been able to help! I edited your post to remove your IPv6 information. Have a great one!