- Locate and then click the following registry subkey:
HKEY_LOCAL_MACHINE\SOFTWARE\Microsoft\Windows\CurrentVersion\Policies\System
- On the Edit menu, point to New, and then click DWORD (32-bit) Value.
- Type LocalAccountTokenFilterPolicy to name the new entry, and then press Enter.
- Right-click LocalAccountTokenFilterPolicy, and then click Modify.
- In the Value data box, type 1, and then click OK.
- No reboot necessary.
windows
Fixing Windows IPv6
Update 8-13-2023: You may or may not need some or all of these commands anymore.
Below is a set of commands you can try running to help resolve issues with multiple random temporary addresses, and seemingly all of IPv6 stops working randomly. I use DHCP6 on my home network and this has helped to resolve a lot of connectivity issues for me. I don’t seem to lose IPv6 connectivity anymore.
The interface does seem to still get more than one address, which is frustrating, but probably due to router advetisements on my firewall. It only seems to use the primary one it gets from DHCP however, which is good. I have tried doing netsh int ipv6 set interface “<interface>” routerdiscovery=disabled store=persistent but, it does not persist after a reboot, and netsh int ipv6 show interface “<interface>” shows that it is enabled again. I imagine there is some registry edit that can be done, or adding it to task scheduler but, until it becomes an issue I am find that the below works for me.
I don’t know why Microsoft has made this so hard. All of my Linux and FreeBSD machines can acquire and maintain an IPv6 address forever. A singular address.
You’ll need to run these in an Administrator command prompt. You can access that by right-clicking your Start button and choosing either Command Prompt (Admin) or Windows Powershell (Admin). If you only have Powershell, once it opens, type cmd and press enter to go into a command prompt shell. Alternatively, press your Windows key or click the start button, and type cmd and press CTRL-SHIFT-ENTER once you see Command Prompt in the list (you will only need to type cmd, the start menu will select Command Prompt after a moment in ‘Best Match‘ at the top of the search results.)
netsh int ipv6 set privacy state=disabled store=active
netsh int ipv6 set privacy state=disabled store=persistent
netsh int ipv6 set global randomizeidentifiers=disabled store=active
netsh int ipv6 set global randomizeidentifiers=disabled store=persistent
Afterwards, I find going into Control Panel, (small icons) Network and Sharing Center, Change Adapter Settings, and right-click on your interface and Disable it, then Enable it with another right-click. Or you can reboot.
Windows Server 2019 – Stuck on Private Network Profile
Sometimes, randomly, Windows Server will switch to a Private Network Profile after a reboot, or just sporadically. Usually restarting the NlaSvc service will resolve this, but I have found if it keeps happening on reboot, this will also help resolve this issue.
In order to fix this, all I needed to change was the dependencies for NlaSvc (Network Location Awareness Service). From an Administrative command prompt I ran the following:
sc config NlaSvc depend=NSI/RpcSs/TcpIp/Dhcp/EventLog/DNS/NTDS
After rebooting, my profile finally showed as a Domain network instead of a Private Network.
Windows Server 2019 is available as a free 180 day evaluation: https://www.microsoft.com/en-us/evalcenter/evaluate-windows-server-2019
PHP 7, MySQL 8 & WordPress on IIS
2/16/2021 – I still plan to update this more, just been busy with a new job!
This is a work in progress – pictures will be added, stories will be written, coffees will be spilled.
- Use MySQL Workbench to create a user with a Standard Password, and create a Schema, then give your user permissions on the Schema.
- Open PHP Manager in IIS Manager after installing so it can make some changes to php.ini..enable the extra modules in there as well.
- You probably want to reboot after updating your PATHs and things just so IIS can find everything
- I know this is vague…just trying to get it started.
If this helps you in the mean time, great!
- Dependencies for ImageMagick and other things…
- VC15 Dependencies (PHP7): https://windows.php.net/downloads/php-sdk/deps/vc15/x64/
- VS16 Dependencies (PHP8): https://windows.php.net/downloads/php-sdk/deps/vs16/x64/
- PHP8 doesn’t have ImageMagick deps yet
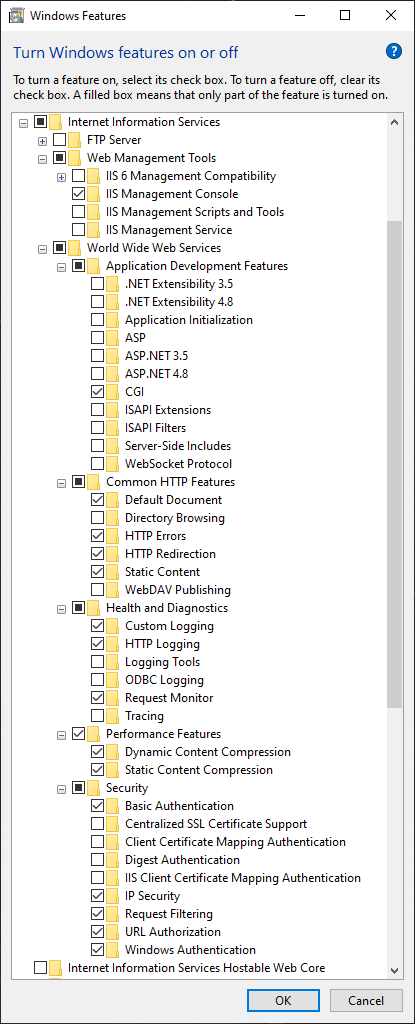
- IIS Installation
- Control Panel – Programs & Features – Add/Remove Windows Components
- [X] Internet Information Services
- Web Management Tools -> [X] IIS Management Console
- World Wide Web Services -> Application Development Features -> [X] CGI
- Common HTTP Features
- All except Directory Browsing (unless wanted), WebDAV Publishing
- Health and Diagnostics
- [X] HTTP Logging, Request Monitor
- [X] Performance Features (both Dynamic + Static)
- Security
- [X] Basic, IP, Request Filtering, URL Authorization, (if needed) Windows Auth
- [X] Internet Information Services
- Control Panel – Programs & Features – Add/Remove Windows Components

- Downloads
- 7-Zip (for extracting MSI files if needed)
- PHP 7.4.14
- https://windows.php.net/download/ (7.4.14)
- must use “Non Thread Safe” version on IIS
- extract to e.g. C:\PHP\7.4.14
- https://windows.php.net/download/ (7.4.14)
- PHP Manager for IIS 10
- WinCache for PHP Windows Cache Extensions 2.0
- https://sourceforge.net/projects/wincache/files/
- https://sourceforge.net/projects/wincache/files/development/
- For PHP 7.4 – https://sourceforge.net/projects/wincache/files/development/wincache-2.0.0.8-dev-7.4-nts-vc15-x64.exe/download
- extract with 7zip/etc and copy the php_wincache.dll to PHP\7.4.14\ext
- MySQL Community Installer – install server, workbench (during setup)
- WordPress
- https://wordpress.org/download/#download-install
- https://wordpress.org/latest.zip
- extract to C:\inetpub\wwwroot
- ImageMagick… + deps etc
- http://windows.php.net/downloads/pecl/releases/imagick/ – for PHP\7.4.14\ext\ folder
- https://windows.php.net/downloads/php-sdk/deps/vc15/x64/ImageMagick-LATEST-x64.zip – for binaries & dependencies – extract to a folder in your PATH (NOT your ImageMagick install folder if you decide to install it anyway even though you don’t need it..you should not be overwriting anything.. e.g. C:\PHP\7.4.14\extras\imagick and then add this folder to your global PATH)
- A lot of guides on the Internet specify to also install ImageMagick itself – this is not necessary. The dependencies come with everything that is needed, and all the versions will match.
- URL Rewrite
- https://www.iis.net/downloads/microsoft/url-rewrite (scroll to bottom of page for downloads)
- https://download.microsoft.com/download/1/2/8/128E2E22-C1B9-44A4-BE2A-5859ED1D4592/rewrite_amd64_en-US.msi
- OpenSSL (incl. x64 despite URL)
- Web Platform Installer
- I do not recommend you use this. It installs old versions of things.
- Folder Permissions
- Give IIS_IUSRS read access to c:\inetpub
- Give IIS AppPool\DefaultAppPool (or IIS AppPool\yoursite.com) access to c:\inetpub\wwwroot or whatever folder you have created inside c:\inetpub
- yes, the second part of the ‘test settings’ in IIS will fail…this is normal if you’re using local accounts
- web.config
- This is IIS equivalent of .htaccess which does not exist nor get used on IIS.
- It seems WordPress was able to update web.config for pretty link creation and you shouldn’t have to manually do this.
- Force SSL redirect is one you’ll need if you enable SSL and needs to go before the pretty links rule
<rule name="HTTPs 301 redirect" stopProcessing="true">
<match url="(.*)" />
<conditions logicalGrouping="MatchAll" trackAllCaptures="false">
<add input="{HTTPS}" pattern="^OFF$" />
</conditions>
<action type="Redirect" url="https://{HTTP_HOST}/{R:1}" redirectType="Permanent" />
</rule>